If I get enough positive feedback, I will do tutorials more often. Constructive criticism is welcome! There are a lot of pictures so beware!

My "oh dear I have a headache but must look gorgeous for the camera!" look. :-P

Been getting requests for side profile pictures so here you go.


Tutorial after the jump.
My eye area is large and very open so I didn't close my eye for these pics. Let me know if that's OK with you. :-)
Start with a nekkid eye! :-P Obviously have my brows filled in already.

Apply a very tiny amount of Monistat Chafing Relief Powder-Gel to the upper lid with ring finger, let it set about 30 seconds, then apply Detrivore Eye Primer on top and the lower lash line (it's sticky, a little shimmery and makes eyeshadow more bold) using the ring finger as well.

Take a brush like MAC 217 (or any shader/blender brush you like) and apply Sparkle Dust just below the eyebrow. Then use the same brush and apply MAC - Kitchmas on the brow bone and blend downward into the crease.

Take a brush like MAC 217 (or any shader/blender brush you like) and apply MAC - Ruby Red to the crease by lightly patting, then sweeping in a windshield wiper motion along the crease and going a little higher with it on the outer edges of the eyes. Don't worry about it not looking perfect yet, we will blend it later.

Take a brush like MAC 239 (or any shader brush you like) and apply MAC - Dark Soul to the upper lid by patting.

Use the same brush to blend it upwards into the crease.

Take a small brush like MAC 228 (or whatever you like) and apply MAC - Ruby Red to the inner corner by patting.

Take a small brush like MAC 228 (or whatever you like) and apply MAC - Dark Soul to the lower lash line by patting, then sweeping outward to the corners.

Time to blend! Take a brush like MAC 217 and apply Simply Natural's - Flesh (a matte skin tone shadow) to lightly blend the lower lash line and outer edges with long sweeps back and forth.
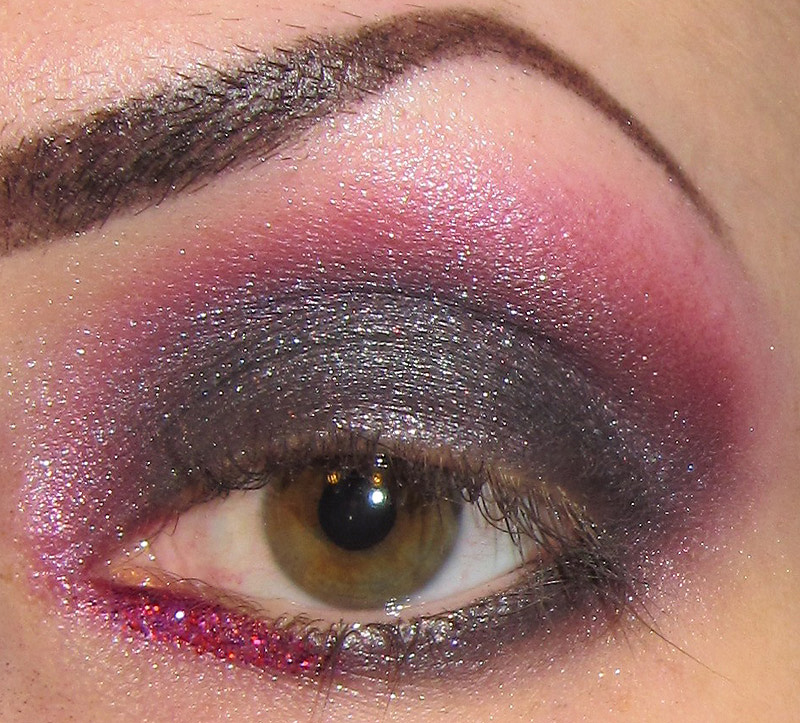
Using a small taklon brush, mix Medusa's Makeup glitter - Love Missile with Graftobian Glitter glue and apply to the lower inner corner by gently swiping it on.

Here's a different angle so you can see the glitter better.

Take a liner brush like MAC 210 to mix with water and Kryolan Aquacolor liner - Black (the best liquid liner ever!) to get the consistency you like and gently, slowly apply to the upper lash line and extend outward to form a wing. Remember practice, patience and a steady hand will create lovely winged liner.
If you don't have Kryolan Aquacolor liner, then use whatever liner you want.

Apply false lashes. I used Ardell #111

Apply NYX Jumbo Pencil in white to the water line. Will make your eyes look bigger. I transferred my White Jumbo Pencil to a jar so I apply mine with a MAC 210 brush. It's easier than trying to stick that huge pencil in your eyeball and saves you more product so it will last much longer.

You should come out looking like this! :-P Or more so the pictures at the beginning of this post. Heh heh!
Here's the rest of what is on my face:
Eyebrows: Ardell eyebrow powder in soft black (applied with MAC 266)
Lips: My Stuff - some lippy I made a while ago...don't think I've worn it before but I love it!
Face: Skin MD Shielding lotion
Physicians Formula Healthy Wear SPF 50 Powder in Translucent Light (applied using a flocked sponge by patting then blending)
Lips: My Stuff - some lippy I made a while ago...don't think I've worn it before but I love it!
Face: Skin MD Shielding lotion
Physicians Formula Healthy Wear SPF 50 Powder in Translucent Light (applied using a flocked sponge by patting then blending)
I forgot to put blush on. Oops!
I really hope this tutorial was helpful! If you have any questions, please let me know!
~BLIX
Whoa the last pic made me jump :D
ReplyDeleteGorgeous look & great tutorial, thanks! Love that lippie too.
Love the look and love the tutorial.
ReplyDeleteGreat job!!
xox
LOLOLOLOLOLOLOLOLOL i love your last face! They always make me laugh. And I LOVE your false eyelashes
ReplyDeleteAMG the lips are hot!
ReplyDeleteI LOVE LOVE LOVE the picture tutorial!
OMG!!! This is sooo fab! Wonderful makeup...thanks for the tute:))
ReplyDeleteThank you! I've just started reading and am clueless as to how to do the incredible looks you've got going on.
ReplyDeleteGeorgeous!! And your sense of humour, the best thing!
ReplyDeleteawesome, I love picture tutorials for learning how to do looks, but for basics like blending i turn to youtube! this is such a pretty look ♥
ReplyDeleteyes very good tutorial ! It's helpful !
ReplyDeleteI prefer a picture tutorial over a video. I can linger on the picture as long as I want to understand placement, shading and blending. Plus, I don't have to mute it! The look is beautiful and I'm going to try it with MAC Cranberry. I really enjoy your blog...
ReplyDeleteThis is so much better than a video, thank you :)
ReplyDeleteThat looks so lovely - thanks for the tutorial! :D
ReplyDeleteOne question: Do you wear contact lenses? And if yes, do they go well with the NYX pencils on the waterline? I'm still searching for a liner/pencil for the waterline that won't make my eyes tear like crazy when I'm wearing contacts, and I was thinking about getting a NYX one.
Any recommendations?
ooh love it! I've been thinking of doing a picture or video tutorial too, but the editing of videos etc puts me off coz I reckon it'll take too much time!
ReplyDeleteThanks for doing a picture tutorial, it defo works for me, its nice and easy to see where you're applying the products, good job!
<3
OMG BLIX!!! This is so awesome and helpful! I always wonder how you craft these gorgeous complex eye looks you do, and this picture tutorial helps me decipher it. I've been wishing you'd do videos, but this is just as good! Thank you, please do more like it if you can!
ReplyDeleteI love using my Kryolan Black Aquacolor as a liner too! :) I love your looks honey. I love seeing you go bold with color. (so many people stay with neutrals ALL the time) I thinks is cool that you make your own lippies and such as well. More picture tutorials I say! :)
ReplyDeleteHow did you transfer your NYX pencil to a jar exactly?
Thank you! I'm glad you all enjoyed the tutorial. I will try to do them more often now. :-)
ReplyDeleteI don't have a lot of time to reply to every comment, so I will just reply to the ones that had questions. Hope nobody minds. I swear I'm not being a poophead!
ElectronicRainbow - sickly sweet,
No, I don't wear contacts so I have no idea what is OK for contact wearers. I just know that I really like the NYX Jumbo pencils on the waterline because they don't budge. If I can find anyone who knows how they do or if there are other liners that are OK to use with contacts, I will let you know for sure.
Snooglerat,
I transferred my NYX pencil by placing the tip in a 5 gram jar (aiming downward) and put it in a cup to keep it from falling over. Then I microwaved it until it all melted into the jar. There is a metal piece at the bottom of the pencil that needs to be removed before microwaving it. Can be a bit difficult but you may need a pair of strong pliers to pull it off. Although I think some gals just cut it off with a basic kitchen knife.
I'm such a dumbass...I have been calling my NYX jumbo pencil "white" but it's called MILK...duh! I've been doing that for months and never noticed. I think it's because it's in a jar with no label...and it's white. Hee hee. I'm guessing no one noticed. Ha!
Very nice tutorial. I am not a fan of video tutorials either as I have no time to watch them. I'd like to see more!
ReplyDeletelast pic was scary..hehehe..but i loved this look..well xplained..
ReplyDeleteHAVE A HAPPY NEW YEAR
my recent post diy-homemade-scrub
Pics are good, its frozen so I have lots of time to look/absorb. How do you keep colors from falling on your cheeks? You made red look great btw.
ReplyDeleteBadass!!! I love the last pic lol
ReplyDeleteHahaha, I love that last photo :D This look is so awesome and vampy to me :3 This is the kind of look I'd go out in. I wouldn't have thought to put the bright upper color on first, instead of the darker main eyelid color. Obviously everyone loves the tutorials :D I would love to see one where you have the very defined line between your eyelid and crease line. I've been pondering for the last week on how you do it. XD
ReplyDelete<3 Anna
Thank you for the info!
ReplyDeleteNYX White, Milk, ehhhh... I just assumed what your talking about :)
Loooove the pinky red in the crease and the coordinating glitter :3 great tutorial!
ReplyDelete